1. 建立一個上傳的 Form
<html>
<body>
<form action="upload_file.php" method="post" enctype="multipart/form-data">
<label for="file">Filename:</label>
<input type="file" name="file" id="file"><br>
<input type="submit" name="submit" value="Submit">
</form>
</body>
</html>
Notice the following about the HTML form above:
The enctype attribute of the <form> tag specifies which content-type to use when submitting the form. "multipart/form-data" is used when a form requires binary data, like the contents of a file, to be uploaded
The type="file" attribute of the <input> tag specifies that the input should be processed as a file. For example, when viewed in a browser, there will be a browse-button next to the input field
Note: Allowing users to upload files is a big security risk. Only permit trusted users to perform file uploads.
Create The Upload Script
The "upload_file.php" file contains the code for uploading a file:
<?php
if ($_FILES["file"]["error"] > 0) {
echo "Error: " . $_FILES["file"]["error"] . "<br>";
} else {
echo "Upload: " . $_FILES["file"]["name"] . "<br>";
echo "Type: " . $_FILES["file"]["type"] . "<br>";
echo "Size: " . ($_FILES["file"]["size"] / 1024) . " kB<br>";
echo "Stored in: " . $_FILES["file"]["tmp_name"];
}
?>
By using the global PHP $_FILES array you can upload files from a client computer to the remote server.
The first parameter is the form's input name and the second index can be either "name", "type", "size", "tmp_name" or "error". Like this:
$_FILES["file"]["name"] - the name of the uploaded file
$_FILES["file"]["type"] - the type of the uploaded file
$_FILES["file"]["size"] - the size in bytes of the uploaded file
$_FILES["file"]["tmp_name"] - the name of the temporary copy of the file stored on the server
$_FILES["file"]["error"] - the error code resulting from the file upload
This is a very simple way of uploading files. For security reasons, you should add restrictions on what the user is allowed to upload.
Restrictions on Upload
In this script we add some restrictions to the file upload. The user may upload .gif, .jpeg, and .png files; and the file size must be under 20 kB:
<?php
$allowedExts = array("gif", "jpeg", "jpg", "png");
$temp = explode(".", $_FILES["file"]["name"]);
$extension = end($temp);
if ((($_FILES["file"]["type"] == "image/gif")
|| ($_FILES["file"]["type"] == "image/jpeg")
|| ($_FILES["file"]["type"] == "image/jpg")
|| ($_FILES["file"]["type"] == "image/pjpeg")
|| ($_FILES["file"]["type"] == "image/x-png")
|| ($_FILES["file"]["type"] == "image/png"))
&& ($_FILES["file"]["size"] < 20000)
&& in_array($extension, $allowedExts)) {
if ($_FILES["file"]["error"] > 0) {
echo "Error: " . $_FILES["file"]["error"] . "<br>";
} else {
echo "Upload: " . $_FILES["file"]["name"] . "<br>";
echo "Type: " . $_FILES["file"]["type"] . "<br>";
echo "Size: " . ($_FILES["file"]["size"] / 1024) . " kB<br>";
echo "Stored in: " . $_FILES["file"]["tmp_name"];
}
} else {
echo "Invalid file";
}
?>
Saving the Uploaded File
The examples above create a temporary copy of the uploaded files in the PHP temp folder on the server.
The temporary copied files disappears when the script ends. To store the uploaded file we need to copy it to a different location:
<?php
$allowedExts = array("gif", "jpeg", "jpg", "png");
$temp = explode(".", $_FILES["file"]["name"]);
$extension = end($temp);
if ((($_FILES["file"]["type"] == "image/gif")
|| ($_FILES["file"]["type"] == "image/jpeg")
|| ($_FILES["file"]["type"] == "image/jpg")
|| ($_FILES["file"]["type"] == "image/pjpeg")
|| ($_FILES["file"]["type"] == "image/x-png")
|| ($_FILES["file"]["type"] == "image/png"))
&& ($_FILES["file"]["size"] < 20000)
&& in_array($extension, $allowedExts)) {
if ($_FILES["file"]["error"] > 0) {
echo "Return Code: " . $_FILES["file"]["error"] . "<br>";
} else {
echo "Upload: " . $_FILES["file"]["name"] . "<br>";
echo "Type: " . $_FILES["file"]["type"] . "<br>";
echo "Size: " . ($_FILES["file"]["size"] / 1024) . " kB<br>";
echo "Temp file: " . $_FILES["file"]["tmp_name"] . "<br>";
if (file_exists("upload/" . $_FILES["file"]["name"])) {
echo $_FILES["file"]["name"] . " already exists. ";
} else {
move_uploaded_file($_FILES["file"]["tmp_name"],
"upload/" . $_FILES["file"]["name"]);
echo "Stored in: " . "upload/" . $_FILES["file"]["name"];
}
}
} else {
echo "Invalid file";
}
?>
The script above checks if the file already exists, if it does not, it copies the file to a folder called "upload".
上傳檔案對 PHP 來說是個相當重要的功能,PHP 可以上傳各式各樣的檔案類型,像是文件檔 word 的 .doc、Excel 的 .xls、PowerPoint 的 .ppt、PDF、exe、影片檔案如 avi、rmvb、flv .... 圖片檔案類型等等。
上傳檔案最基本的架構有三個重點:
- 上傳頁面(HTML)
- 處理檔案(PHP)
- 儲存上傳檔案的資料夾
這個頁面是要給上傳檔案的人看的,必須包含表單(form)、上傳檔案的欄位以及一個上傳按鈕。
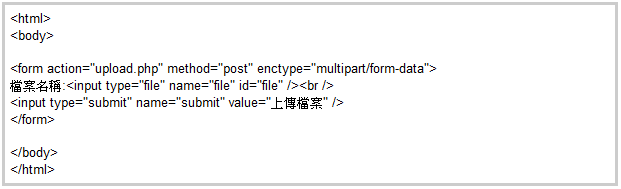
注意表單 form 需要加上 enctype="multipart/form-data" 代表你要上傳檔案,input type="file" 這裡是上傳檔案的欄位。PHP 一次可以上傳多個檔案,這裡介紹單一檔案上傳,順利完成單一檔案上傳後,也可以嘗試看看多檔案上傳唷!
步驟二、建立一個資料夾來裝上傳的檔案
PHP 檔案上傳後會先放到一個暫存資料夾(tmp),再用 move_uploaded_file 將檔案移動到你的網站資料夾中,所以你必須建立好一個放檔案的資料夾在網站根目錄,我們暫時將這個資料夾命名為 upload。記得權限要設為可以寫入才能夠使用唷!通常預設是可以寫入,如果你待會上傳的檔案沒辦法寫入,就必須改一下資料夾權限。
步驟三、建立處理上傳檔案的 PHP 檔案 upload.php
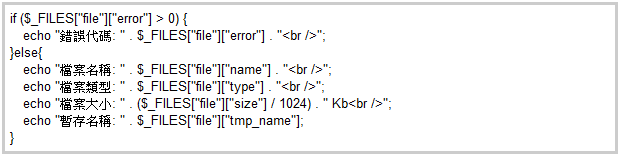
在寫程式碼之前需要先了解 PHP 怎麼判斷檔案的各種數據
- $_FILES["file"]["name"]:上傳檔案的原始名稱。
- $_FILES["file"]["type"]:上傳的檔案類型。
- $_FILES["file"]["size"]:上傳的檔案原始大小。
- $_FILES["file"]["tmp_name"]:上傳檔案後的暫存資料夾位置。
- $_FILES["file"]["error"]:如果檔案上傳有錯誤,可以顯示錯誤代碼。
如果都沒有問題的話,接著我們開始加入「移動檔案到資料夾」的動作,此動作相當的重要,主要是將剛剛上傳到伺服器暫存資料夾的檔案正式移動到你的網站目錄底下,如此一來網友才看得到。
移動檔案請用 move_uploaded_file()
move_uploaded_file($_FILES["file"]["tmp_name"],"upload/".$_FILES["file"]["name"]);
將此 function 加到我們的程式碼中

現在你已經可以將檔案上傳並順利移動到你的資料夾中囉!但是這樣其實並不完整,我們應該再加入檔案是否存在的判斷,避免有時候一個不小心重覆上傳相同的檔案,這裡可以採用 PHP 的 file_exists() 函式來判斷。

如果要檢查上傳檔案是否為一個 image file,使用getimagesize, 如果傳回來 0 就不是一個 images.
沒有留言:
張貼留言