2014年8月13日 星期三

CCS 如何處理錯誤訊息


範例一:如果該頁沒有收到 task_id,則不予顯示:

function Page_AfterInitialize(& $sender) { 
if (CCGetFromGet("task_id","") == "") { 
    print ("Error: \"task_id\" parameter is not specified.");
    exit;
  }
}


範例二:如果該頁沒有收到 task_id 參數,則 Tasks 物件不予顯示,並顯示錯誤訊息。 
$Tasks_Error 是自行建立的一個 Label Control。

function Page_AfterInitialize() {
global $Tasks;
global $Tasks_Error;

  if (CCGetFromGet("task_id","") == "") { 
    $Tasks->Visible = False;
    $Tasks_Error->SetValue("Error: \"task_id\" parameter is not specified.");
  }

}

2014年8月12日 星期二

php 的 ternary operator: ? :

ternary operator 三元操作元

語法:(expr1) ? (expr2) : (expr3)

意思是:  如果 (expr1) 為 true  ,則傳回 (expr2),否則傳回(expr3)

例如:

$opening_time = ($day == "WEEKEND") ? 12 : 9;

相當於:

if ($day == "WEEKEND")
    $opening_time = 12;
else
    $opening_time = 9;


php regular expression

http://www.regular-expressions.info/php.html

http://www.rexegg.com/regex-php.html

http://webcheatsheet.com/php/regular_expressions.php


PHP正則表達式-使用preg_match()過濾字串

在網頁程式撰寫的時候,經常需要把使用者輸入的字串做過濾
但有些時候並非惡意攻擊字串
可能使用者只是輸入錯誤
因此我們需要做一些基本的檢查來預防和提式
下面是使用 preg_match() 這個函數來檢查字串的方式

首先先簡單介紹一下 preg_match() 這個函數的用法

    preg_match( 正則表達式 , 要比對的字串 , 比對結果)

其中比對結果是一個陣列,其中陣列結果是 $result[0]=原字串、$result[1]=第一個符合規則的字串、$result[2]=第二個符合規則的字串...以此類推

比對結果則回傳 1(正確) 或是 0(錯誤)

下面是一個簡單的範例

        if(preg_match($regex, $resource , $result)) {

            echo "OK";

        } else {

            echo "error";

        }


另外附上幾個常用的表達式

       //A. 檢查是不是數字

       $standard_A = "/^([0-9]+)$/";

       //B. 檢查是不是小寫英文

       $standard_B = "/^([a-z]+)$/";

       //C. 檢查是不是大寫英文

       $standard_C = "/^([A-Z]+)$/";

       //D. 檢查是不是全為英文字串

       $standard_D = "/^([A-Za-z]+)$/";

       //E. 檢查是不是英數混和字串

       $standard_E = "/^([0-9A-Za-z]+)$/";

       //F. 檢查是不是中文

       $standard_F = "/^([\x7f-\xff]+)$/";

       //G. 檢查是不是電子信箱格式

       //$standard_G_1 這組正則允許 "stanley.543-ok@myweb.com"

       //但 $standard_G_2 僅允許 "stanley543ok@myweb.com" ,字串內不包含 .(點)和 -(中線)

       $standard_G_1 = "/^[\w-]+(\.[\w-]+)*@[\w-]+(\.[\w-]+)+$/";

       $standard_G_2 = "/^[\w]*@[\w-]+(\.[\w-]+)+$/" ;

       //下面則是個簡單的範例,大家可以嘗試看看


       $string = "stanley.543-ok@myweb.com" ;

       $standard_G_1 = "/^[\w-]+(\.[\w-]+)*@[\w-]+(\.[\w-]+)+$/";

       $standard_G_2 = "/^[\w]*@[\w-]+(\.[\w-]+)+$/" ;

       function checkString($strings, $standard){

           if(preg_match($standard, $strings, $hereArray)) {

              return 1;

           } else {

              return 0;

           }

       }

       echo checkString($string, $standard_G_1);

       echo "<br>";

       echo checkString($string, $standard_G_2);


preg_match 進行正則表示式比對資料


int preg_match ( string pattern, string subject [, array matches [, int flags]] )

程式會在 string subject 中進行比對是否有符合 string pattern 條件的結果

很多人剛開始使用 preg_match 都蠻不了解其正規的用法,其實就算不完全了解正規的用法也是可以了解 preg_match 初階的使用方式,基本觀念就是給一個字串讓 preg_match 去幫你比對出符合條件的部分,透過幾個範例應該就能上手。

範例一、用 preg_match 單純的找出是否符合條件

if (preg_match("/1/i", "12345")) {
    echo "條件符合";
} else {
    echo "條件不符合";
}

這個範例會顯示條件符合。其中 i 表示不區分大小寫。

範例二、用 preg_match 找出完全符合的字母

if (preg_match("/\bdef\b/i", "abcdefg")) {
 echo "條件符合";
} else {
 echo "條件不符合";
}

這個範例會顯示條件不符合。其中 \b 所代表的意思是完全符合才算數,也就是說字串 abcdefg 中必須要有獨立的 def 才算符合,以目前狀況來說 abcdefg 全部黏在一起,所以並不符合,我們可以做個修改

if (preg_match("/\bdef\b/i", "abc def g")) {
 echo "條件符合";
} else {
 echo "條件不符合";
}

這樣子就會輸出條件符合囉!

範例三、用 preg_match 找出網址的部分

preg_match('@^(?:http://)?([^/]+)@i',"http://www.webtech.tw", $matches);
$host = $matches[1].'';
echo   $host;

這樣會輸出 www.webtech.tw,preg_match 先比對條件符合的結果,再把他放到 matches 陣列中,如果你輸出 matches 陣列會看到這樣

Array ( [0] => http://www.webtech.tw [1] => www.webtech.tw ) 

接著我們再利用 preg_match 去取得 webtech.tw 這樣的結果

preg_match('/[^.]+\.[^.]+$/', $host, $matches);
echo $matches[0];

這樣就順利找到咱們的 domain name 囉!


php 檔案下載


【PHP】下載檔案但不直接開啟
多數人在下載檔案的頁面直接連結該檔案, 如下寫法 ----

a href="檔名.副檔名"

這在 windows 系統會有一個可能的狀況, 當此類型檔案與 windows 預設開啟功能產生關聯時(通常是以副檔名為判斷依據), 一點擊這個下載連結時, windows 就會自動啟動此類型檔案的程式並開啟此檔案, 例如:

下載的檔案為 demo.txt, 而 .txt 檔在 windows 預設的開啟程式為記事本, 所以一點擊此連結, windows 便會啟動記事本並開啟 demo.txt, 但實際上我們所希望的是真正的下載 demo.txt 並儲存在硬碟內.

要達到此目的, 我們需要另一個專門下載檔案的 PHP 小程式, 假設我們將這個小程式命名為 downloadfile.php, 其程式內容如下 ----

if(isset($_GET['file']))
{
    // $_GET['file'] 即為傳入要下載檔名的引數
    header("Content-type:application");
    header("Content-Length: " .(string)(filesize($_GET['file'])));
    header("Content-Disposition: attachment; filename=".$_GET['file']);
    readfile($_GET['file']);
}

另外, 改寫原下載頁面的 html 語法 ----

a href="downloadfile.php?file=檔名.副檔名"


PHP檔案下載

下載的檔案與實際的檔案不同:

<?php

include("auth1.php"); //可不加上此行

header("Content-type: text/html; charset=utf-8");

$file="./9707.zip"; // 實際檔案的路徑+檔名

$filename="0714.zip"; // 下載的檔名

//指定類型

header("Content-type: ".filetype("$file"));

//指定下載時的檔名

header("Content-Disposition: attachment; filename=".$filename."");

//輸出下載的內容。

readfile($file);

?>

開啟網頁前的認證(auth1.php ):

<? header("Content-type: text/html; charset=utf-8");

if (empty($_SERVER['PHP_AUTH_USER'])) {

header('WWW-Authenticate: Basic realm="Please input"');

header('HTTP/1.0 401 Unauthorized');

echo '請輸入正確的帳號及密碼, 不可以取消!';

exit;

} else {

$correctName="pcschool";

$correctpwd="mysql" ;

if (($_SERVER['PHP_AUTH_USER'] != $correctName) or

($_SERVER['PHP_AUTH_PW'] !=$correctpwd)){

echo "登入失敗,請開啟新的瀏覽器重新登入";

}

}

?>


Read more: http://jiannrong.blogspot.com/2009/08/php.html#ixzz3ACCzhUCJ


PHP 檔案下載 header 設置

用以下的方式,可以讓大部份瀏覽器 (主要是 IE) 詢問你是否要下載檔案 (而不是直接開啟) 。

<?php
$file_name = "file.name";
$file_path = "/path/to/realfile";
$file_size = filesize($file_path);
header('Pragma: public');
header('Expires: 0');
header('Last-Modified: ' . gmdate('D, d M Y H:i ') . ' GMT');
header('Cache-Control: must-revalidate, post-check=0, pre-check=0');
header('Cache-Control: private', false);
header('Content-Type: application/octet-stream');
header('Content-Length: ' . $file_size);
header('Content-Disposition: attachment; filename="' . $file_name . '";');
header('Content-Transfer-Encoding: binary');
readfile($file_path);
?>

補充:
•$file_name: 這是給瀏覽器看的檔案名稱,也就是下載視窗會出現的那個檔名;它可以跟實際檔案的名稱不一樣!
•$file_path: 會連到實際檔案的位置,也就是該檔案在伺服器上的真實路徑。
•$file_size: 檔案的大小。
•若php.ini 的 memory_limit 設的太小,會造成網頁一直在讀取, 不會跳出下載視窗的問題。


部分代碼如下
$filename="test.pdf";
$file = dirname(__FILE__)."/upload_file/".$file_name ;//注1
if(file_exists($file)){//注2
header("Expires: 0");
header("Pragma: no-cache");//注3
header("Cache-Control: no-store, no-cache, must-revalidate, post-check=0, pre-check=0");
header("Content-Type: application/force-download");
header("Content-Type: application/octet-stream");
header("Content-Type: application/download");
header('Content-disposition: attachment; filename=' . basename($file)); //注4
header("Content-Type: application/pdf");
header("Content-Transfer-Encoding: binary");
header('Content-Length: ' . filesize($file));
@readfile($filename);
   exit(0);
}
解釋一下上面作注的地方
注1:$file = dirname(__FILE__)."/upload_file/".$file_name ;
    指定要下載檔案(假設要下載的檔所在資料夾與當前檔所在的資料夾的處在同一級)
注2:if(file_exists($file) 判斷指定檔是否存在。
注3:header("Pragma: no-cache");
   這裡若是伺服器便用了SSL,即通過HTTPs來訪問的話。要將no-cache改成private
   即header("Pragma: private");
注4: header('Content-disposition: attachment; filename=' . basename($filename));
   basename($filename) 取出檔案名
   Content-disposition: attachment;點下載後出現下載對話方塊。若不需要出現下載對話方塊直接打開的話,將 
   attachment改成in-line 即:Content-disposition: in-line;


注意點:要確認一下php.ini中的output_buffering的設定,如果是output_buffering = Off的話,將它修改成如下
    output_buffering = 4096
    ;output_buffering = Off


[PHP 檔案下載]

參考網址   http://blog.roodo.com/jaceju/archives/805389.html

用以下的方式,可以讓大部份瀏覽器 (主要是 IE) 詢問你是否要下載檔案 (而不是直接開啟) 。

 $file_name = "file.name";
 $file_path = "/path/to/realfile";
 $file_size = filesize($file_path);
 header('Pragma: public');
 header('Expires: 0');
 header('Last-Modified: ' . gmdate('D, d M Y H:i ') . ' GMT');
 header('Cache-Control: must-revalidate, post-check=0, pre-check=0');
 header('Cache-Control: private', false);
 header('Content-Type: application/octet-stream');
 header('Content-Length: ' . $file_size);
 header('Content-Disposition: attachment; filename="' . $file_name . '";');
 header('Content-Transfer-Encoding: binary');
 readfile($file_path);
?>

[PHP 讀大檔]

$fp = fopen("sn.txt", "r");
while (!feof($fp)) {
   $content. = fgets($fp);
}

[php寫入成 excel檔, 並可從網頁下載]

  header("Content-Disposition:filename=myfile.xls");
 header("Content-type:application/vnd.ms-excel");
 $content = "a \t b\t c\t d\n";
 $content .= "e \t f\t g\t h\n";
 echo $content;
?>

php 中文檔名上傳問題

使用 php 的檔案上傳,英文檔名都沒有問題,然而遇到中文檔名,就不行了!

Google了一下網路上相關文章很多,不外乎:

1. 用 iconv() 轉碼
2. 用 mb_convert_encoding() 轉碼

這兩個方法,我都試了,都是失敗的!為什麼呢?

還在找答案。

另外一個方法是,不管中文檔名了,上傳時將中文檔名,改成一個英數字的檔名,並且將原始中文檔名記錄到資料庫中,然後以改過的英數字檔名上傳。
顯示出來的上傳檔案列表資訊就抓資料庫中的原始名稱,而連結就連結到英數字的檔名。
這樣,大概就能解決中文檔名的問題了。


https://gist.github.com/AyoiS/7178911

解決檔案上傳時,PHP的basename函數不支援中文的方法
<?php
//php自帶的basename函數不支持中文,下面這個方法是最簡單的實現。
function get_basename($filename){
return preg_replace('/^.+[\\\\\\/]/', '', $filename);
}
  • preg_replace('/^.+[\\\\\\/]/', '', $FileName)
某些中文字可以,"山水"可以,但是其他的還是失敗了!

閱讀到網站上某網友的意見:好像這樣是比較好的解決方案了。

"我認為不太需要花時間在處理「中文」這件事情上了。
基本上我檔案上傳後,「中文」名稱是直接存進資料庫。
然後將上傳的檔案用另外的規則重新編檔(我是用日期時間+tmp_name再用md5壓成主檔名)
當然副檔名還是保留原來的。
下載的時候才從資料庫將中文檔名取出來「裝回去」。
使用者下載回來的還是正常的中文檔名檔案。"


-------------------------------
* 註:2020/10/28/12:44,又遇到中文檔案要上傳的問題,查了資料、使用 CCS 試了,修改 CCS 裡面的 Classes.php、還有主檔案的 record 資料庫 新增時,分別轉換  iconv()。以上另外紀錄。

參考:http://blog.e-happy.com.tw/php-move_uploaded_file-to-upload-documents-in-the-name-of/

PHP上傳中文檔案發生錯誤的原因在於中文版的伺服器若是使用 Big5 在編碼,而由網頁送過來資料卻是以 UTF8 來編碼,如此一來在接收時就會產生編碼的錯失,導致檔案上傳的失敗。我們建議您修改的方式,就是將接收到的檔名,由 UTF8 轉為 Big5 的編碼,最後再儲存即可。

move_uploaded_file($_FILES['fileField']['tmp_name'],
iconv("UTF-8", "big5", $target_path )

PHP上傳檔案

使用 PHP,可以將檔案上傳到 server

1. 建立一個上傳的 Form

<html>
<body>

<form action="upload_file.php" method="post" enctype="multipart/form-data">
<label for="file">Filename:</label>
<input type="file" name="file" id="file"><br>
<input type="submit" name="submit" value="Submit">
</form>

</body>
</html>

Notice the following about the HTML form above:

The enctype attribute of the <form> tag specifies which content-type to use when submitting the form. "multipart/form-data" is used when a form requires binary data, like the contents of a file, to be uploaded
The type="file" attribute of the <input> tag specifies that the input should be processed as a file. For example, when viewed in a browser, there will be a browse-button next to the input field
Note: Allowing users to upload files is a big security risk. Only permit trusted users to perform file uploads.

Create The Upload Script
The "upload_file.php" file contains the code for uploading a file:

<?php
if ($_FILES["file"]["error"] > 0) {
  echo "Error: " . $_FILES["file"]["error"] . "<br>";
} else {
  echo "Upload: " . $_FILES["file"]["name"] . "<br>";
  echo "Type: " . $_FILES["file"]["type"] . "<br>";
  echo "Size: " . ($_FILES["file"]["size"] / 1024) . " kB<br>";
  echo "Stored in: " . $_FILES["file"]["tmp_name"];
}
?>

By using the global PHP $_FILES array you can upload files from a client computer to the remote server.

The first parameter is the form's input name and the second index can be either "name", "type", "size", "tmp_name" or "error". Like this:

$_FILES["file"]["name"] - the name of the uploaded file
$_FILES["file"]["type"] - the type of the uploaded file
$_FILES["file"]["size"] - the size in bytes of the uploaded file
$_FILES["file"]["tmp_name"] - the name of the temporary copy of the file stored on the server
$_FILES["file"]["error"] - the error code resulting from the file upload
This is a very simple way of uploading files. For security reasons, you should add restrictions on what the user is allowed to upload.

Restrictions on Upload
In this script we add some restrictions to the file upload. The user may upload .gif, .jpeg, and .png files; and the file size must be under 20 kB:

<?php
$allowedExts = array("gif", "jpeg", "jpg", "png");
$temp = explode(".", $_FILES["file"]["name"]);
$extension = end($temp);

if ((($_FILES["file"]["type"] == "image/gif")
|| ($_FILES["file"]["type"] == "image/jpeg")
|| ($_FILES["file"]["type"] == "image/jpg")
|| ($_FILES["file"]["type"] == "image/pjpeg")
|| ($_FILES["file"]["type"] == "image/x-png")
|| ($_FILES["file"]["type"] == "image/png"))
&& ($_FILES["file"]["size"] < 20000)
&& in_array($extension, $allowedExts)) {
  if ($_FILES["file"]["error"] > 0) {
    echo "Error: " . $_FILES["file"]["error"] . "<br>";
  } else {
    echo "Upload: " . $_FILES["file"]["name"] . "<br>";
    echo "Type: " . $_FILES["file"]["type"] . "<br>";
    echo "Size: " . ($_FILES["file"]["size"] / 1024) . " kB<br>";
    echo "Stored in: " . $_FILES["file"]["tmp_name"];
  }
} else {
  echo "Invalid file";
}
?>

Saving the Uploaded File
The examples above create a temporary copy of the uploaded files in the PHP temp folder on the server.

The temporary copied files disappears when the script ends. To store the uploaded file we need to copy it to a different location:

<?php
$allowedExts = array("gif", "jpeg", "jpg", "png");
$temp = explode(".", $_FILES["file"]["name"]);
$extension = end($temp);

if ((($_FILES["file"]["type"] == "image/gif")
|| ($_FILES["file"]["type"] == "image/jpeg")
|| ($_FILES["file"]["type"] == "image/jpg")
|| ($_FILES["file"]["type"] == "image/pjpeg")
|| ($_FILES["file"]["type"] == "image/x-png")
|| ($_FILES["file"]["type"] == "image/png"))
&& ($_FILES["file"]["size"] < 20000)
&& in_array($extension, $allowedExts)) {
  if ($_FILES["file"]["error"] > 0) {
    echo "Return Code: " . $_FILES["file"]["error"] . "<br>";
  } else {
    echo "Upload: " . $_FILES["file"]["name"] . "<br>";
    echo "Type: " . $_FILES["file"]["type"] . "<br>";
    echo "Size: " . ($_FILES["file"]["size"] / 1024) . " kB<br>";
    echo "Temp file: " . $_FILES["file"]["tmp_name"] . "<br>";
    if (file_exists("upload/" . $_FILES["file"]["name"])) {
      echo $_FILES["file"]["name"] . " already exists. ";
    } else {
      move_uploaded_file($_FILES["file"]["tmp_name"],
      "upload/" . $_FILES["file"]["name"]);
      echo "Stored in: " . "upload/" . $_FILES["file"]["name"];
    }
  }
} else {
  echo "Invalid file";
}
?>
The script above checks if the file already exists, if it does not, it copies the file to a folder called "upload".


上傳檔案對 PHP 來說是個相當重要的功能,PHP 可以上傳各式各樣的檔案類型,像是文件檔 word 的 .doc、Excel 的 .xls、PowerPoint 的 .ppt、PDF、exe、影片檔案如 avi、rmvb、flv .... 圖片檔案類型等等。

上傳檔案最基本的架構有三個重點:
  1. 上傳頁面(HTML)
  2. 處理檔案(PHP)
  3. 儲存上傳檔案的資料夾
步驟一、先利用 HTML 建立一個簡單的上傳檔案頁面

這個頁面是要給上傳檔案的人看的,必須包含表單(form)、上傳檔案的欄位以及一個上傳按鈕。
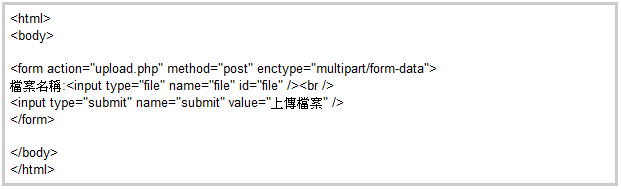


注意表單 form 需要加上 enctype="multipart/form-data" 代表你要上傳檔案,input type="file" 這裡是上傳檔案的欄位。PHP 一次可以上傳多個檔案,這裡介紹單一檔案上傳,順利完成單一檔案上傳後,也可以嘗試看看多檔案上傳唷!

步驟二、建立一個資料夾來裝上傳的檔案

PHP 檔案上傳後會先放到一個暫存資料夾(tmp),再用 move_uploaded_file 將檔案移動到你的網站資料夾中,所以你必須建立好一個放檔案的資料夾在網站根目錄,我們暫時將這個資料夾命名為 upload。記得權限要設為可以寫入才能夠使用唷!通常預設是可以寫入,如果你待會上傳的檔案沒辦法寫入,就必須改一下資料夾權限。

步驟三、建立處理上傳檔案的 PHP 檔案 upload.php

在寫程式碼之前需要先了解 PHP 怎麼判斷檔案的各種數據
  • $_FILES["file"]["name"]:上傳檔案的原始名稱。
  • $_FILES["file"]["type"]:上傳的檔案類型。
  • $_FILES["file"]["size"]:上傳的檔案原始大小。
  • $_FILES["file"]["tmp_name"]:上傳檔案後的暫存資料夾位置。
  • $_FILES["file"]["error"]:如果檔案上傳有錯誤,可以顯示錯誤代碼。
現在你了解了 PHP 如何判斷檔案上傳後的資料,接著就可以運用這些資料去做檔案上傳的功能囉!以下是檔案上傳的基本架構,你可以先透過這個架構看看檔案是否有問題,若有碰到什麼問題可以在這個階段先處理好。
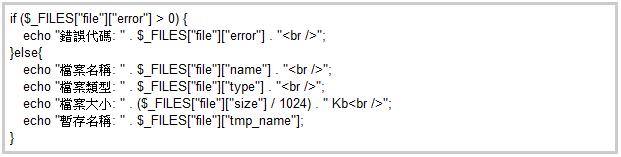


如果都沒有問題的話,接著我們開始加入「移動檔案到資料夾」的動作,此動作相當的重要,主要是將剛剛上傳到伺服器暫存資料夾的檔案正式移動到你的網站目錄底下,如此一來網友才看得到。

移動檔案請用 move_uploaded_file()

move_uploaded_file($_FILES["file"]["tmp_name"],"upload/".$_FILES["file"]["name"]);

將此 function 加到我們的程式碼中
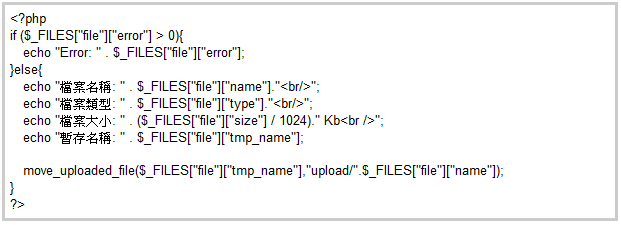


現在你已經可以將檔案上傳並順利移動到你的資料夾中囉!但是這樣其實並不完整,我們應該再加入檔案是否存在的判斷,避免有時候一個不小心重覆上傳相同的檔案,這裡可以採用 PHP 的 file_exists() 函式來判斷。


如果要檢查上傳檔案是否為一個 image file,使用getimagesize, 如果傳回來 0 就不是一個 images.


2014年7月31日 星期四

Code Charge Studio 的 Data Dictionary 資料庫字典

在 CCS 裡面內建有 D.D.資料庫字典。
其作用是讓設計者可以為CCS的 Form Builder 表單建立器建立Controls控制項時預先設定各種屬性。這樣一來,設計者就可以減少每一次都重複的為Form Builder填寫重複的屬性資料。可以重複使用。

CCS的DD還可以用來查詢資料庫目錄、改變產生表單的屬性、匯入或匯出自行定義的DD。

要先建立一個 Database connection, 資料庫連結。

DD可以匯出為 XML 格式。這樣就可以儲存、重複使用、與其他專案共用、或建立不同版本的管理等。

DD跟特定的 database connection名稱綁定在一起。例如,你有一個資料庫連結叫做 IntranetDB,那麼,建立的 DD也會叫做 IntranetDB,而匯出的XML的檔案就叫做:IntranetDB_DataDictionary.xml

DD 可以從功能表單中選取到。DD也可以從程式建立器中呼叫。

注意:從程式建立器中更改欄位的屬性,如果再重新建立一次,可能會改變原本的設定。


Data Dictionary Example資料字典範例

This example shows you a simple case where you may use the Data Dictionary to configure the default properties of the forms and controls generated by the builders.
以下的範例展示一個簡單的狀況,你可以使用資料字典來設定程式建立器所建立的表單控制項的屬性預設值。

Changing Captions and Defining a Link Parameter 改變標題及定義連結參數

This example is just a simple demonstration of configuring the Data Dictionary to change the default controls, captions and titles of forms. We will use the 'departments' and 'employees' table of the 'intranet' sample database to display a list of departments and the employees that belong to each department. We will configure our changes in the data dictionary first, then run the Grid builder to create two forms like the ones shown below. The page should display a list of department names. When we click on one of the departments, the second grid will display a list of all the employees within the department.

CodeCharge Studio comes with two sample Access databases, plus corresponding ODBC DSN definitions that are installed automatically when you install CodeCharge Studio. The sample database files are located in the installation folder. There are also several SQL scripts to create the databases in other formats. See Connecting to Databases. For this example, create a connection to the 'Intranet' sample database called 'intranet'. Which type of connection (e.g. OLEDB, ODBC, SQL Server, MySQL, etc.) should not matter as long as the database definition is the same.
Click on the 'Data Dictionary' tab and select 'Open Connection', then the connection for 'intranet'.

Double click on the 'departments' table.
Click on 'department_name' in the middle part of the Property Editor. This changes the current database field and updates the list of properties accessible in the Data Dictonary Property Editor . You can also change the selected database field, by clicking on the column in the Database Explorer.
At the top of the Property Editor, change the 'Form Title (Display)' property to: 'Department List'
Click on the 'display' tab in the Property Editor and select 'Link' for the default control when this database item is used for display. We want to use the department name as a link parameter for submission to other forms.
Although we won't use the other properties in this example, some other properties we might want to change for now are: 'Display Caption', 'Input Caption', and 'Form Title (Input)'.
The Data Dictionary at this point should look like this:

When users click on the department name, we want to submit an URL parameter, so click on the Href Source and the ellipsis (...) in this field, and define a parameter like this:
The 'Static address' for the web page is just a placeholder. You want to redirect the browser to the page containing the form you want to pass the parameter to (e.g. the current page in this example), but since you have not created the page yet, it is not possible to select this value. In your own applications, if you know the page you want to direct the browser to, select it for the address.
Ordinarily, you would select a database field for the source of the parameter, however since this control is not part of a form yet (e.g. a Grid), there is no datasource, so set the 'Source Type' to an expression. Once you have added this database field to a form, you will need to change the 'Source Type' to a 'datasource column'.
Next, we want to change the default title that will appear on the 'employee' list. Click on the 'employees' table and for this example, change the 'Form Title (Display)' to 'Employee List'.
The employee list is displayed in a grid with captions running across the top of the grid. We want to change the captions of each column to be more expressive than the defaults so change the captions as shown below. For each caption, select the column of the employees table, then click on the 'Display' tab at the bottom of the Property Editor and then change the 'Caption' property in the grid. For this example, we'll change the captions to:
From: Emp Id To: Id
From: Emp Login To: Login
From: Emp Password To:Password
From: Emp Name To: Employee Name
From: Emp Title To: Title
From: Phone Home To: Home Phone
From: Phone Work To: Work Phone
From: Phone Cell To: Cell Phone
Instead of 'group_id' and the 'department_id' values, we want to display 'group' and 'department' names, so we will join the 'departments', 'groups', and 'employees' tables when we build the grid for the Employee List and include these fields from the other tables in the grid form.
Run the Grid Builder and for the datasource, select the 'departments' table, and build a query that returns both the 'department_name' and the 'department_id'. Use 'build query' to create the query. Remove the 'department_id' from the grid form. That is, include 'department_id' in the query (datasource) but do not display it in the grid.
Do not include a 'search' form for this grid. The other options are unimportant for this example, but we included the 'sorter control' so the list could be arranged alphabetically. Remember, we changed the default title for the 'departments' table to 'Department List', so this should be the default title as it appears on the form. Also, we defined the default control for 'department_name' as a Link control, so the the web page at this point should look like the one below.
The field caption is optional.
When we configured the data dictionary, we could not set the specific page associated with the Link paramter, nor determine the source for the parameter value. In Design mode, click on the 'department_name' control, and change the properties of the Link. Open 'Href source' and change the 'Static address' by selecting the current page. Change the 'Source Type' for the parameter to 'DataSource Column' and verify that the 'Parameter Source' is 'department_id' (the name of the database column). If you don't make these changes your application is likely to fail (e.g. with compilation errors since the generated code is incorrect).
When the user clicks on a department name, the form will submit an URL parameter like so: 'dept_id=<the 'department_id' value>'

Run the Grid Builder again to add another grid for the Employee list. For the datasource, build a query in Design mode that looks something like this by joining the Employee, Department, and Group tables, and adding a SQL WHERE clause that returns the fields desired from the Employee table, including 'department_name' and 'group_name' from the 'department' and 'group' tables.
SELECT <all of the selected fields of the employees>, department_name, group_name
FROM employees
WHERE department_id = {dept_id}

where '{dept_id} is an URL parameter that will be submitted from the Department grid. The 'default value if parameter is missing' should be -1. i.e. display the employees only when a department has been selected.
Rearrange the fields selected in the builder until the order and number of fields matches the 'Employee List' form at the top of this section: department_name, group_name, emp_name, emp_login, emp_password, title, email, phone_home, phone_work, phone_cell. Change the captions for 'department_name' and 'group_name' to 'Department' and 'Group'.
Notice that the control generated for 'department_name' is a Link control. This is because we configured it this way in the data dictionary so the control type would be correct in the 'Department List' form. In Design mode, select this control and change the control type to Label. It is not necessary to change any properties but this change is very important; without it, your application will likely fail (e.g. compilation error) because, as you may recall, we did not fully define the Link control properties in the data dictionary (e.g. parameter source type).
Because we joined multiple tables, the Grid Builder combined all of the default form titles into one heading. Modify the title in the builder to 'Employee List'.
The other options in the Grid Builder are unimportant for this example. The final web page should look something like the picture at the top of this section.


如何判斷現在FORM是在 insert mode? 還是 update mode?

只要用  if (empty({primary_key})) 就可以知道是否為新增模式了。 如果 {promary_key} 是空白的,那麼就是在新增模式;反之,就是更新模式。 以上。